Automate TradingView to My Funded Futures
The definitive guide to automating your TradingView workflow for My Funded Futures with PickMyTrade. Learn how to translate your TradingView signals into flawlessly executed trades with precision, control, and scale.

TradingView
Your Signals

PickMyTrade
Automation Engine

Tradovate
Live Execution
This guide covers everything from account setup to multi-account management
Start LearningFirst, Let's Get You Connected
Setting up your PickMyTrade account and connecting to Tradovate takes just a few minutes.
Account Creation & Login
Standard signup process: register and verify your email.
Important Note
No Extra CostYou do not need to purchase API access from Tradovate. PickMyTrade is an authorized vendor, and API access is included with your PickMyTrade subscription.
Connecting Your Tradovate Account
Click "Connect to Tradovate"
Choose Mode (Demo or Live)
Enter credentials
Demo Mode
For paper trading, prop firm accounts (Apex, TopStep, etc.), and evaluations.
Live Mode
Use exclusively for live, funded trading accounts.
My Funded Futures rules for automated trading
MFFU is one of the only major futures prop firms that explicitly permits TradingView-webhook automation and same-direction copy trading — here's what its 2026 rulebook actually says about plans, payouts, drawdown, and automation, cross-checked against MFFU's own help center.
Plan Lineup
As of 2026, MFFU runs a one-step, no-time-limit evaluation across five tiers: Core ($50K only, 80/20 split, 3% EOD trailing drawdown), Rapid ($50K–$150K, 90/10 split — raised in a January 2026 update, one of the richest splits in the industry — 4% intraday trailing drawdown), Pro ($50K–$150K, 80/20 split, 3% EOD trailing drawdown, 14-day payout cycle), plus lower-cost Flex and Builder entry tiers. Every plan needs just 2 minimum trading days to pass.
Payout Terms
Minimum withdrawal differs by plan — $250 on Flex, $500 on Rapid and Builder, $1,000 on Pro — with cadence ranging from roughly every 5 winning days up to Pro's 14-calendar-day cycle. Approved payouts route through Riseworks via ACH bank transfer or crypto and typically clear in about 6–12 business hours, one of the faster payout pipelines among futures prop firms.
Automation & Copy Trading
MFFU explicitly permits semi-automated trading, EAs, and TradingView-webhook tools like PickMyTrade across every plan, plus same-direction copy trading between your own accounts — as long as you actively monitor the strategy. Fully autonomous, unsupervised bots and any system firing more than 200 trades a day are still banned.
Free Reset Credit
MFFU markets itself as one of the only firms crediting a free evaluation reset at every monthly subscription renewal — win, lose, or already breached — so one blown attempt doesn't automatically mean paying for a brand-new evaluation.
The Consistency Rule Is a Look-Back, Not a Cap
Rapid, Flex, and Pro evaluations use a 50% consistency rule — no single day can be more than half of your total evaluation profit — but it's only checked when you request a pass, and breaching it just means trading more days, not losing the account. Core drops the rule once funded but caps any single funded payout day at 40% of that cycle's profit. Neither rule limits how PickMyTrade sizes or times your automated entries.
One of the Highest-Rated Firms on Trustpilot
MFFU has held a Trustpilot score around 4.9 out of 5 from tens of thousands of reviews as of 2026, among the highest of any futures prop firm. Forum sentiment tends to praise responsive support and the free reset policy, while the recurring complaint is strict enforcement of drawdown and consistency rules — a trade-off traders generally weigh against MFFU's above-market profit splits.
Setting Up My Funded Futures With PickMyTrade
MFFU has no native TradingView broker panel, so PickMyTrade is the bridge between your alerts and your funded account. Tradovate-based Core, Rapid, and Pro accounts connect at pickmytrade.trade; Rithmic-cleared accounts, including NinjaTrader users, connect at pickmytrade.io. After linking your MFFU broker connection, use Generate Alert to produce a webhook URL and JSON payload — paste the webhook into your TradingView alert and the JSON into the alert message, and every signal routes straight to your account, whichever plan or drawdown model it runs on.
Frequently Asked Questions About Automating MyFundedFutures
Answers specific to running PickMyTrade automation on a MyFundedFutures Core, Rapid, Pro, Flex, or Builder account.
Yes. MFFU explicitly permits semi-automated trading and third-party execution tools, so a PickMyTrade webhook that fires your TradingView alerts into a Tradovate-connected MFFU account is compliant, as long as you monitor the strategy and stay under MFFU's cap of 200 trades per day for algorithmic activity. Fully unsupervised, autonomous bots are not allowed.
No. PickMyTrade only routes and sizes the orders your TradingView alerts generate — it doesn't change how MFFU calculates the 50% evaluation consistency rule on Rapid, Flex, and Pro, or the 40% funded-cycle rule on Core. Since the rule is a look-back check on your total profit history rather than a real-time cap, you trade with automation exactly as you would manually; just watch your best day relative to your cumulative total, the same way you would without it.
All of them, as long as the account runs on Tradovate or Rithmic. Core, Rapid, and Pro accounts on Tradovate connect at pickmytrade.trade; Rithmic-cleared accounts, including NinjaTrader users, connect at pickmytrade.io. Flex and Builder accounts follow the same connection flow, since MFFU clears every plan through the same Tradovate/Rithmic infrastructure.
No. Your drawdown — 3% EOD trailing on Core and Pro, 4% intraday trailing on Rapid — is calculated by MFFU's own risk engine off account equity, not by PickMyTrade. What PickMyTrade adds is risk tooling on the alert side: trailing-stop placeholders, percentage- or points-based position sizing, and a max-loss kill switch you can set well inside MFFU's drawdown before it's ever tested.
Nothing changes on the PickMyTrade side — it keeps executing your TradingView alerts on whichever account is currently active. On MFFU's side, a Rapid account that nets $10,000 in a single day triggers a review toward live capital, and any account that renews unbreached is credited a free reset. Neither event requires touching your PickMyTrade webhook or alert configuration.
Your First Decision: Strategy or Indicator?
The way you configure alerts in PickMyTrade depends entirely on what you're automating from TradingView. Understanding this distinction is key to a successful setup.
TradingView
STRATEGY
How to Identify
Shows a back-testing report in the Strategy Tester tab.
Alert Setup
Requires only one alert. Uses placeholders like {{strategy.order.action}} to handle buys, sells, and closes automatically.
Order Types
Supports Market Orders & Limit Order(Need manual changes: View Here )
Best For
Fully coded, back-tested systems with complete entry and exit logic built into the Pine Script. The simplest path to automation.
TradingView
INDICATOR
How to Identify
No back-testing report. You create alerts based on conditions (e.g., RSI crosses 70).
Alert Setup
Requires three separate alerts: one for Buy, one for Sell, and one for Close.
Order Types
Highly flexible. Supports Market, Limit, and Stop orders.
Best For
Traders using standard indicators (RSI, MACD, Bollinger Bands) or those who require advanced order types and precise control over Take Profit/Stop Loss parameters within PickMyTrade.
Not Sure Which One You Have?
Open your TradingView chart and look for the "Strategy Tester" tab at the bottom. If it's there with performance metrics and a trade list, you have a Strategy. If not, you're working with an Indicator.
Your Risk Management Toolkit: 5 Ways to Set TP/SL
PickMyTrade gives you precise control over your exits. Choose the method that best fits your strategy.
Points (or Dollar Value)
Set TP/SL based on a fixed point/dollar move from entry.
Example:
(NQ, Qty: 2, Lot Size: 20): A 1-point SL = 1 * 20 * 2 = $40 risk.
Percentage
Set TP/SL based on a percentage of the entry price.
Example:
Entry at $100, 1% SL -> Stop placed at $99.
Price (Dynamic Levels)
Use dynamic price levels directly from your indicator's plots in TradingView.
Pro-Tip:
Extremely powerful for strategies using levels like Bollinger Bands, pivot points, or ATR bands. You
must plot the value in your Pine Script. PickMyTrade can then use the {{plot_0}} to {{plot_19}}
placeholders.
Ticks
Set TP/SL based on a specific number of ticks. Mandatory to specify the symbol.
Example:
(NQ, Qty: 2, Tick Size: 0.25): 10-tick SL = 10 * 0.25 * 20 * 2 = $100 risk.
Total Profit/Loss
Set TP/SL based on a total P/L amount for the entire position.
Example:
(Qty: 2): $10 TP/SL per contract = $20 total P/L target.
Trailing Stop Loss
Lock in profits while letting winners run. Defined by three key parameters.
Trail Value: Distance from current price
Trail Trigger: Profit to activate trailing
Trail Frequency: How often SL updates
Advanced Risk: Mastering the Trailing Stop Loss
The trailing stop loss is a powerful tool to lock in profits while letting winners run. It's defined by three key parameters:
Trail Value:
What it is: The distance the stop loss maintains from the current price.
Example: Example: "Trail Value = 5 points". If price is $115, the stop is at $110.
Trail Trigger:
What it is: The amount of profit required to activate the trailing mechanism for the first time.
Example: Example: "Entry = $100", "Initial SL = $95", "Trail Trigger = 10 points". When price reaches $110, the trail activates, and the stop moves from $95 up to $105.
Trail Frequency:
What it is: How often the stop loss updates after being triggered.
Example: Example: "Trail Frequency = 15 points". After activating at $110, the stop will only move up again each time the market makes another 15-point move in your favor.
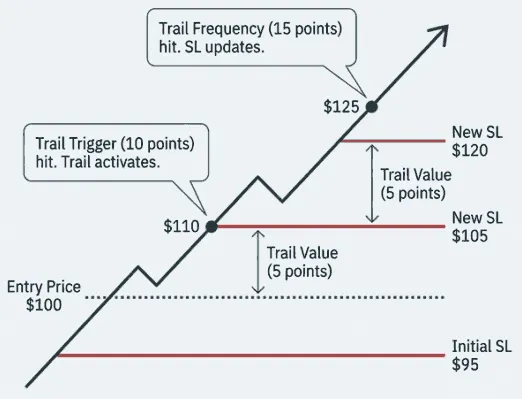
Trail Value:
The distance the stop loss maintains from the current price.
Example: "Trail Value = 5 points". If price is $115, the stop is at $110.
Trail Trigger:
The amount of profit required to activate the trailing mechanism for the first time.
Example: "Entry = $100", "Initial SL = $95", "Trail Trigger = 10 points". When price reaches $110, the trail activates, and the stop moves from $95 up to $105.
Trail Frequency:
How often the stop loss updates after being triggered.
Example: "Trail Frequency = 15 points". After activating at $110, the stop will only move up again each time the market makes another 15-point move in your favor.
Position Sizing Options
Control exactly how many contracts are entered on each signal.
Fixed Quantity
Absolute value. Enters a fixed number of contracts on every signal. Simple and direct.
Example:
Set Quantity = 2, every signal enters 2 contracts.
Risk Percentage
Dynamic sizing based on your account value. Stop Loss is mandatory for this calculation.
How it works (Example)
| Account Value: | $1,000 |
| Risk %: | 10% (Total Risk = $100) |
| Symbol: | NQ (Lot Size = $20) |
| Stop Loss: | 5 points ($5 * $20 = $100 risk per contract) |
Total Risk ($100)
÷
Risk per Contract ($100)
= 1 Contract
Warning:
If the calculated quantity is less than 1, the trade will not be placed.
The Indicator Workflow: Crafting Your Entry
If you're automating an indicator, here's how to configure your alerts and order types in PickMyTrade.
Alert & Order Types
Buy Alert
Closes any existing open position (buy or sell) and cancels any open orders before entering a new buy position.
Sell Alert
Closes any existing open position (buy or sell) and cancels any open orders before entering a new sell position.
Close Alert
Squares off the current position and cancels open orders. It does not enter a new trade.
Order Type
Choose between Market, Limit (with optional fill-or-kill timeout in seconds), or Stop orders.
Position Sizing
Fixed Quantity
Absolute value. Enters a fixed number of contracts on every signal. Simple and direct.
Risk Percentage
Dynamic sizing based on your account value. Stop Loss is mandatory for this calculation.
Account Value: $1,000
Risk %: 10% (Total Risk = $100)
Symbol: NQ (Lot Size = $20)
Stop Loss: 5 points ($5 * $20 = $100 risk)
→ Calculation: $100 / $100 = 1 Contract
The Strategy Workflow: A More Streamlined Path
Automating a strategy is simpler because TradingView handles the buy/sell logic. Your main decision is how to manage exits.
The Key Question
Does your Pine Script strategy already contain multiple Take Profit and Stop Loss levels (strategy.exit, etc.)?
YES
My strategy handles all exits.
In PickMyTrade, under "Exit Strategy Type," select YES.
The platform will not allow you to set risk parameters. PickMyTrade will simply execute the exit orders exactly as they are sent from your TradingView script. This is for traders who want full control within their code.
NO
I want PickMyTrade to manage my exits.
In PickMyTrade, under "Exit Strategy Type," select NO.
Consequence: The platform will now allow you to use its full suite of risk management tools (the 5 TP/SL types, Trailing Stop, Break-Even) just like in the indicator workflow.
The Final Step: Generating and Placing Your Alert
Once your settings are configured, activating your automation is a simple copy-and-paste process.
In PickMyTrade, click the "Generate Alert" button. Select the Tradovate account(s) you want to trade on.
A popup will appear with your alert code (JSON). Click "Copy Code".
From the PickMyTrade dashboard, copy the unique Webhook URL.
Open the alert creation window in TradingView. Paste the JSON into the "Message" box. Paste the Webhook URL into the "Notifications" tab. Click "Create". Your automation is now live.
Critical Rule
Never manually edit the JSON code. If you need to make a change, go back to the UI, adjust the settings, and regenerate a fresh code. Manual edits are the most common source of errors.
Scaling Your Operation with Multi-Account Management
A single TradingView alert can execute trades across multiple Tradovate accounts simultaneously. This is built for traders who run several prop firm accounts of their own under one or more logins.
Method 1: Sub-Accounts (Under a Single Tradovate Login)
Who it's for
You have multiple accounts (e.g., several Apex or TopStep accounts) all accessible under one Tradovate username.
How it works
In the "Add Account" section, simply select the desired sub-accounts from the dropdown menu. PickMyTrade handles the rest. This requires only one PickMyTrade subscription.
All accounts under one Tradovate login
Method 2: External Accounts (Different Tradovate Logins)
Who it's for
You need to trade for a friend, family member, or on a prop firm account that requires a separate Tradovate login.
How it works
Your client/friend needs their own PickMyTrade account connected to their Tradovate login. They provide you with their PickMyTrade Token and Tradovate Account Name. You add this as an external account.
Link separate Tradovate logins via PickMyTrade tokens
Quantity Multiplier
For every account you add (sub-account or external), you can set a quantity multiplier (e.g., 0.5 for half size, 2.0 for double size) to manage risk proportionally across different account sizes.
Beyond Signal Automation: The Manual Trade Copier
A tool designed to copy trades you execute manually on a master account to one or more client/slave accounts in real-time. This is separate from TradingView alert automation.
Who It's For
Traders managing multiple prop firm accounts who want to place a single manual trade and have it replicated everywhere.
Discretionary traders who place trades by hand and want the same trade to reach every account they have connected.
How It Works (Visual Process Flow)
Add Destination Accounts
Add your sub-accounts or external accounts (using their PickMyTrade token) in the Manual Trade Copier section.
Set Multipliers
Assign a quantity multiplier for each destination account to scale trade sizes appropriately.
Activate
You must click 'Click to Start' at the beginning of each day to activate the copier.
Trade
Place trades on your designated source account. They will be instantly copied to all active destination accounts.
Trade History
View master and slave order IDs for easy tracking.
Liquidate All
A single button to square off all open positions and orders across all destination accounts.
Monitoring Your System & Essential Settings
Understanding the Alert Logs, Symbol Mapping, and Global Risk Settings
Understanding the Alert Logs
The Alert Log is your mission control. It's the first place to look if you have any questions about a trade. It shows every alert received from TradingView and its execution status.
Alert Time
The exact timestamp the alert was received from TradingView.
Alert Status
The most important column. Shows if the order was Filled, Rejected, or Paused.
Entry Order ID
The broker's unique ID for the trade. Essential for cross-referencing with Tradovate.
Alert Data
Click the icon to see the raw JSON data received from TradingView, invaluable for debugging.
Filter logs by date and symbol
Download your complete history as a CSV file
Pro-Tip for Support
If you encounter an issue you can't solve, take a screenshot of the relevant row in your Alert Log and send it to the support team. It provides them with all the necessary data to diagnose the problem quickly.
Behind the Scenes: Essential Settings & Symbol Mapping
1. Symbol Mapping - The Translator
TradingView uses continuous symbols (e.g., NQ1!), while Tradovate requires specific contract month symbols (e.g., NQZ24).
NQ1! NQZ24 The "Symbol mapping not found" error means you're trading a symbol without a pre-configured map. Go to Settings → Create Setting to create your own (e.g., TradingView Symbol: MNQ1! → Tradovate Symbol: MNQZ24).
2. Automatic Contract Rollover
You don't need to do anything. PickMyTrade monitors expiration dates and automatically updates its internal symbol mapping to the next contract month a few days before expiration.
Continue using the continuous symbol (NQ1!) in your TradingView alerts. Your trading will continue uninterrupted.
Set it and forget it
Automatic rollover = seamless trading
3. Global Risk Settings
In the main settings, you can establish global risk parameters like daily or weekly profit/loss limits. If these limits are hit, trading is automatically paused for the defined period, providing a crucial safety net.
Set a daily loss limit of $500. If you hit that threshold, all trading stops automatically until the next day.
Your Troubleshooting Checklist: Common Issues & Solutions
Problem
My TradingView alerts are firing, but they don't appear in my PickMyTrade Alert Logs.
Likely Cause
The webhook connection is broken.
Solution
- Verify the Webhook URL is pasted correctly in the 'Notifications' tab of your TV alert.
- Ensure the 'Message' box contains the JSON code with no extra text or comments.
Problem
My trades are closing immediately after opening.
Likely Cause
Your script is sending conflicting buy and sell signals on the same bar.
Solution
In your TradingView alert settings, ensure the frequency is set to "Once Per Bar Close" to prevent signals from firing mid-bar.
Problem
The connection says "Tradovate Account is Bound With Another Account".
Likely Cause
A trial account restriction. Your Tradovate account was previously connected to a different PickMyTrade trial.
Solution
Subscribe to a paid plan to remove this restriction, or contact support to have the account manually unbound (usually a one-time courtesy).
Problem
My orders are being rejected by Tradovate.
Likely Cause
Broker-side issues like insufficient margin, expired contract, or prop firm risk limits being hit.
Solution
Check the "Order History" directly in the Tradovate platform. Rejected orders are highlighted in red and will show the specific reason from the broker.
For Advanced Users: A Look Inside the JSON
For those comfortable with Pine Script and trade logic, the JSON payload offers powerful overrides. Remember: always regenerate alerts from the UI, do not edit these values by hand.
update_tp & update_sl Default: false
When set to true, a new alert will not place a new trade. Instead, it will find the existing open position and update its Take Profit or Stop Loss order to the new price provided in the alert.
Use Case:
Moving a stop loss to break-even or trailing a stop loss based on dynamic conditions calculated in your Pine Script.
reverse_order_close Default: true (typically)
Controls the behavior of an opposite signal.
true: Long Position → Sell Signal
Close Long → Open Short Position
false: Long Position → Sell Signal
Close Long → Flat Position
If you are long and a sell signal arrives, it closes the long and opens a new short (true). Or if false, it only closes the long.
same_direction_ignore Default: true (typically)
Controls pyramiding.
true: Long Position → Buy Signal
Ignored
false: Long Position → Buy Signal
Adds to Position
true prevents stacking positions. false allows pyramiding.
You Are Now Ready to Automate with Confidence
You have the complete framework to move from a simple signal to a sophisticated, scaled, multi-account trading operation.
Connect Account & Choose Path
(Strategy/Indicator)
Master the Risk Toolkit
(TP/SL, Trail, Break-Even)
Utilize Multi-Account Trading & Manual Copier
(Scale your operation)
Leverage Alert Logs
(Full transparency)
Platform Tour
For a guided walkthrough of the UI, click the 'Tour' button on your dashboard.
Saved Alerts
Configure and save your favorite alert setups as templates using the 'Saved Alerts' feature to speed up your workflow.
Documentation
For deep dives on every feature, including advanced topics like the News Filter and Referral Program, visit the official Docs section.
Ready to Transform Your
TradingView Workflow?
Join 50,000+ traders executing 28M+ automated trades with PickMyTrade. Start your 7-day free trial today—no credit card required.
7-Day Free Trial
No credit card required
Unlimited Strategies
No limits on alerts or trades
24/7 Support
Priority assistance included
Part of our futures trading bot guide, the parent hub for every broker and prop firm we support.
More Tradovate automation guides
Prefer to copy trades across multiple accounts instead? See the My Funded Futures trade copier guide .